un gadget pour fan de la nes ,la table basse manette géante !!
Auteur
Message
gigicats ADMIN
Messages : 1573 Date d'inscription : 26/05/2012 Age : 46 Localisation : Devant un LG
Sujet: un gadget pour fan de la nes ,la table basse manette géante !! Mar 28 Aoû - 2:54
(dsl j'ai pas trouver en francais ,mais bon ca se passe de traduction ^^) la construction : NES coffee table!
The last few posts I made have displayed some of the older videogame-related projects that I have worked on in the past, now it's time to show off my current project!
Since building my Asteroids arcade cabinet replica/ television cabinet, My videogame collection has grown almost double the size, I've completely filled the storage space in the cabinet and now there are boxes, consoles and loose carts all over the floor. A few weeks ago I decided it was about time I made myself some more storage space, and so I began to make this.....
Golly gosh! What could this possibly be!?....
Wait a second! I recognise those shapes! That's a ginourmous fucking NES controller!
(this is what my hands looked like after cutting out the above pieces, basically I had to cut those pieces out of a big piece of 4mm MDF. The only cutting utensil I had at hand was a half blunt graphics scalpel....)
I saw the giant NES controller they made on G4TV and one thing that I thought looked kind stupid was how the surface was perfectly flat and the edges were perfectly sharp (not bevelled), so with this I decided to use some 4mm MDF as a second layer to raise the bits where the plastic stands out, in the next post I'll show how I bevelled the edges to scale.
Here are the button holes after I cut them out, I used a drill and a jigsaw to cut the D-pad holes and a 90mm hole-saw for the A and B buttons, and a spade bit and the jigsaw for start and select.
Here's the top part of the coffee table being glued and clamped together, I didn't want to use screws or nails because I plan to bevel the edged where the screws would obtrude.
NES coffee table update 1: Bevelling the edges
Being a future 3D modeller (hopefully, oh btw I'll probably do some posts of some 3D projects in the future, at the moment I'm modelling an Enzo Ferrari, you can see I used the half finished model in that motion tracking test three posts ago) I love all my edges bevelled.
And I also wanted to bevel the edges of my giant NES controller approximately to scale to how the actual controller is rounded. After finishing the bottom half of the coffee table/ storage box, it was time to start polishing up the shape. To bevel the top edge I just got a 5mm radius (I think approx.) curved router bit and ran it along them, but the vertical edges needed a larger radius curve. I needed to use a plane and some sandpaper.
To make sure I'm curving it straight, I drew two lines about a cm or something back from the edge.
This acts like a guide so I know I'm going even and not curving it more to one side.
Here is what it looked like after I finished planing it, not too hot, it might have been better if I had a less blunt/rusty plane. But not to worry, a bit of sand paper will even that up;
Bam. There you've got yourself a nice straight bevelled edge.
Here's what the box looks like, after I bevelled the edges, on its side.....
NES coffee table update 2: Making the buttons.
With the main part of my NES controller coffee table basically constructed, I was finally able to find the right sized hole-saw in my dads garage (it's basically impossible to find anything in there, seriously look at how much of a mess it is in the background of some of those pictures in the previous posts), it was time to make the A and B buttons.
I don't know whether I mentioned earlier, but besides just asthetically looking like a NES controller, I also wanted the buttons on it to work (and when not being played a large piece of glass sits on top of it so it can be used like a regular coffee table; to place stuff on).
They key to making the buttons for this was sturdiness. I've got some pretty retarded friend who are probably ready to go to town on this thing, so it needs to be able to stand up to a good beating as well as remaining easily playable. Above is my fantastic 5 second sketch of how the buttons might be constructed.
After cutting the buttons roughly, and cutting a backing plate for them, I drilled 3 holes through the plate and half way into the buttons, I then got 3 quarter inch bolts per button, cut the heads off them and hammered them into the button.
I also bought a few small springs to go over the bolts like so.
Next up was to drill the holes in the backing plate a bit larger so there is minimal friction between the bolts and the plate while still guiding the button properly.
The button is positioned through the backing plat and nuts are put on the bolts to stop the button from coming out.
And there you have it, one sturdy, working NES button. After if figured out the proper mounting, I will probably use just some big strips of copper as the contact points for the button. Otherwise, maybe buy some push buttons from dick smith and mount them in there. In the next post; how I constructed the D-pad (that was a whole lot harder to do because it has to rock in all directions).
NES coffee table update 3: Making the D-pad
The hardest to make so far on the NES coffee table has been the D-pad. Because it's multi directional, it can't just be a straight push button like the others, this brings up a few complications, mainly with friction and bits rubbing together.
To actually model the D-pad, I started by cutting out the pattern on the top in some of the 4mm MDF, again using a blunt graphics scalpel (I really should have invested in a good Stanley knife or something).
I glued it onto a cross I cut out of the 18mm MDF.
Then took to it with some sanding paper and gap filler to give it a nice curved look to it.
As I mentioned, actually making it work was the difficult part. I started off just like the other buttons, with one bolt on each arm, a spring on each bolt and a washer to act as stoppers for the springs.
For the backing plate I put a screw through the centre for it to rock on, and so opposite directions couldn't be pushed down simultaneously. I also had to drill the holes a lot bigger to accommodate for the distance that the bolts will travel when they twist and rotate (that's why I needed the washers, because they would otherwise fall straight through these holes).
Here is the the prototype I made before making the actual button.
It is able to rock from side to side, up and down, and diagonally as well. It also seems to be very sturdy and ready to take a beating.
This is the final button, constructed. Next step for me to do is to mount the buttons in the lid of the coffee table and make sure they don't rub or catch on anything.
NES coffee table update 4: mounting the buttons
Having finished making the start and select buttons;
It was time to actually mount the buttons into the lid of the unit itself.
I cut some small strips of the 4mm MDF I had left over to use as packing so I could mount the backing plate for the buttons under the lid and the buttons would protrude the right height above the surface.
Here is the backing plate for the D-pad mounted into the lid, I used two screws per corner just to be sure that it wouldn't rip out if someone whacked the button too hard.
This is what the D-pad backing plate looks like from the top without the D-pad itself inserted in there.
Here is what the underside of the lid looks like after i mounted all of the buttons in there. I'm thinking perhaps I might need put some protectors over those screws so that I don't accidentally store something in the box that is in the way of the screws, thus damaging it.
And viola! Here are all of the buttons mounted, from the top. I'm thinking I might lower the start and select buttons a bit, they look like the protrude just a bit too much for my liking.
Now the next thing for me to do is to either wire up the buttons, or start painting it. I'm thinking the bottom half of the box will be high gloss black (I'll use some spray paint for that) and the gray parts of lid will be semi-gloss gray. The sticker bit of the controller (with the writing and stuff on it) I will probably paint with the left over paint I have from my asteroids arcade cabinet, I will use a roller to paint that because it give it the nice grain to it, just like on an actual NES controller. I'm not sure how to do the writing, if i can't find some decals that match the Nintendo font, I will have to perhaps put some contact over the area with the writing, then cut out and peel back the parts of the contact in the shape of the letters (thus creating a stencil), and paint it that way.
Next post might not be for a while because I'm pretty busy at the moment, but stay tuned and spread the word suckas! NES coffee table update 5: Painting
Hey people, for anyone that's actually following this, sorry it's been so long since my last post, uni has been pretty busy and I've just been finding time here and there to put more and more coats of paint on over the past few weeks.
With the construction of the box and lid itself pretty much complete, it was time to give it a bit of colour (although I personally thought it looked kind of cool in the straight brown colour).
To start, I have everything a few good coats of all-purpose spray primer that dad had a few random cans of lying around the garage:
While doing this, I realised that the parts of the MDF where I had cut it and sanded it etc. where soaking up the paint like a sponge, no matter how many coats I put on. To fix this I just rubbed a heap of gap filler over these bits, which made the surface nice and smooth again, and the primer sat on there very nicely.
To paint the buttons, I wanted a less glossy colour for the D-pad (it looked kinf of "messy" when I tries to paint it gloss black), and a gloss red colour for the A and B buttons, so I went down to the local art store and bought two cans of revel model paint. They were pretty expensive (like 8 bucks each), but they covered the area easily, and they are oil based so they wont rub off or get super dirty with constant use. I also bought a nice new brush, because I was sick of using crappy old knackered brushes I found around the garage, and my god it made painting the buttons SO much easier...
After painting the buttons, I gave the black part of the controller a coat of black acrylic paint that I had left from the asteroids cabinet I made. To do the Nintendo logo, A and B buttons, I laid down three strips of masking tape across where the writing would go, I then printed out the logo at the right scale, I then lined it up and glued the piece of paper I had printed the logo on, onto the strips of masking tape. After sticking it on, I then cut out each letter using a scalpel and peeled back the tape, to reveal the black surface underneath. Effectively creating a perfect mask, that hugs the surface, to prevent paint bleeding.
I then painted the red over this. It took about 7 coats or so, since it's a light colour on a dark colour.
Half way through cutting the the tape, I accidentally cut myself real bad with the scalpel. There wasn't too much blood though:
Here's how the Nintendo logo, A and B buttons came out, I wasn't really happy with how the Nintendo logo came out, the edges of the paint had peeled up slightly because my dad was a retard and said "you don't have to peel it back carefully, just rip the mask off real quick". I don't know whether I should go back and sand it down and redo the logo, I might if it bugs me too much.
Next up was the 4 stripes that run down the controller; I went to my local Bunnings with an NES controller and got the guy to colour match those bits of the controller. We decide that the Taubmans "Copra" colour was the closest match, so he mixed it up for me. Seriously though, where else, besides while making a giant NES controller, would someone even use this colour!? It's like a vomit-brown, hideous colour!
At this point I was worried because the colour on the stripes looked really off when I looked at it here, but once the whole controller was painted, it matches in perfectly.
Once the stripes were down, I could then paint the start and select buttons, I used the same method as the Nintendo logo. It only took about 3 coats of paint for this these bits, because they are on a lighter background.
All these colours so far (besides the buttons), I painted with acrylic paint, because of the shorter drying time and because it doesn't take 3 fucking hours to dry the brush/roller out between coats like with oil based paints. Also because I already had the black and the red left over from the Asteroids cabinet.
Once this overlay section was fully painted, I could then mask it off carefully, and begin painting the plasticy grey parts of the controller.
For this I bought some White Knight "touch up paint", which is meant for metal roofs and stuff, but I suppose that just means its more durable. The guy at Bunnings also helped me pick which colour of this was closest to the NES controller (not that it needed to be that close, most NES controllers are so sun damaged, its hard to tell what the original colour is meant to be).
After a few coats of paint, I peeled back the mask and viola! This is where I started to get really excited, the colours are perfect and everything came off perfectly (which you kind of expect it not to, when you're just figuring out what you're doing along the way)!
Here's what it looks like with the buttons in. In this picture I hadn't painted the base yet (I did that with some black enamel paint I had left of from the asteroids cab)
After this I put in all the button contacts and wired them onto the NES controller PCB and played Super Mario bros. 3 with my girlfriend for like 3 hours, I'm also currently putting the hinges on, and after that, it's done! My parent's gave the piece of glass that I had made this coffee table to fit, to my sister (basically I will stick rubber stoppers to the piece of glass, to sit on the coffee table when it is not being played), so I will have to go get another piece of glass cut to suit it.
Next post will probably be the second last, or last post for this project! Stay tuned to see the awesome retro flavoured results!
NES coffee table update 6: wiring and final construction
While I was giving the coffee table its final paint job, I managed to get my hands on a spare NES controller PCB from a friend (The rubber contacts for the controller it was from were knackered, so I didn't ruin a perfectly good NES controller)
So I got some more coloured wires from Dick Smith and soldered them on to the NES PCB. This is pretty easy because all of the button contacts ran back to a solder point on the board.
I soldered the other end of the wires to a female 9-pin plug I also got from Dick Smith, so that I could plug it in and unplug it from the wiring on the coffee table.
Meanwhile, I had to put the hinges on the lid and bottom part of the table so it could open and close. I Had to chisel out the area where the hinges sat, so that they didn't protrude from the surface, creating a gap between the lid and the base. I also needed to glue screw another piece of wood to the edge that the hinges would sit on, to thicken it up (the 18mm MDF wasn't thick enough to screw the hinges into).
Here is what the hinges looked like once they were screwed in. The pin also comes out, so I can take the lid off whenever I want, like if I needed to repair it or something.
Here is all the wiring for the buttons from the back. The wires there lead into the male side of the 9-pin plug. Here is how I made the button contacts. The big piece of the underside of the button is a piece of copper, which is connected to the ground wire. I used a piece of brass for the other side of the contact because it is more springy than copper, thus it won't just bend flat if the button is pressed all the way down.
And here are the final pictures of how the coffee table looks, all finished and awesome-like! Well it's not quite finished yet; my sister stole the piece of glass that I had designed this for (which sits on top, so you can use it as a table), so I had to order a new one from mitre10 (130 fookin' bucks! That's more than this whole thing cost to make!).
May awesomely daggy 60s styled futon.
Here you can see I have already filled it with crap. It's good though, my room is now a whole lot cleaner. p.s. that's not my n-gage, is swear...... it's my spare one...
And here's a picture of my girlfriend having enormous amounts of retarded-looking fun playing Super Mario bros. 3;
Okay, I got one more post for the coffee table, even though it's finished. I'll post a picture of what it looks like with the piece of glass on, and I'll post a video of us having mega-awesome fun playing it together (and me kind of cracking the shits at Emily for not jumping at the right time.) And I think I'll also post links to all of the NES coffee table posts, so it's easier to view the progress.
et voila !
un gadget pour fan de la nes ,la table basse manette géante !!


 Golly gosh! What could this possibly be!?....
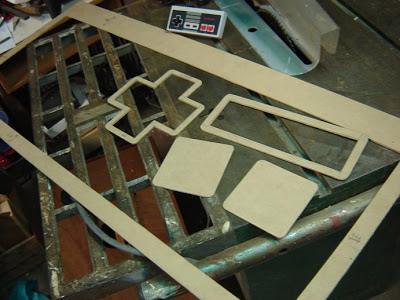 Wait a second! I recognise those shapes! That's a ginourmous fucking NES controller!
 (this
(this I
I Here
Here Here's
 After finishing the bottom half of the coffee table/ storage box, it was time to start polishing up the shape.
 This acts like a guide so I know I'm going even and not curving it more to one side.
 Here
Here Bam. There you've got yourself a nice straight bevelled edge.
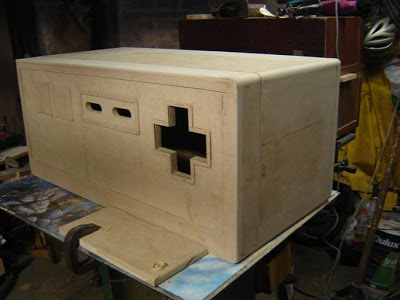 Here's what the box looks like, after I bevelled the edges, on its side.....
 They
They After
After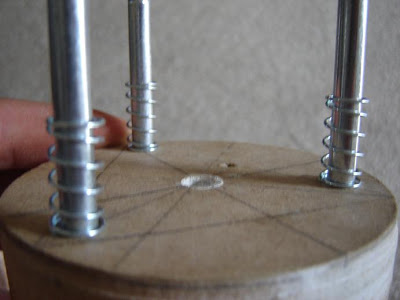 I also bought a few small springs to go over the bolts like so.
 Next
Next The button is positioned through the backing plat and nuts are put on the bolts to stop the button from coming out.
 And there you have it, one sturdy, working NES button.
 To
To I glued it onto a cross I cut out of the 18mm MDF.
 Then took to it with some sanding paper and gap filler to give it a nice curved look to it.
 As
As For
For Here is the the prototype I made before making the actual button.
 It
It This is the final button, constructed.
 It was time to actually mount the buttons into the lid of the unit itself.
 I
I Here
Here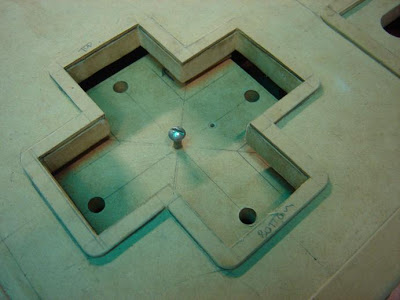 This is what the D-pad backing plate looks like from the top without the D-pad itself inserted in there.
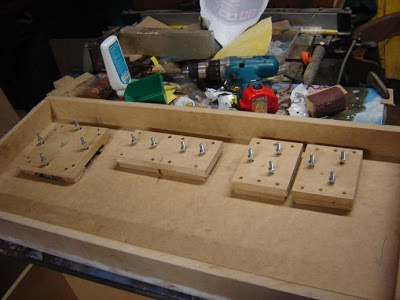 Here is what the underside of the lid looks like after i mounted all of the buttons in there.
 And
And

 While
While To
To After
After I then painted the red over this. It took about 7 coats or so, since it's a light colour on a dark colour.
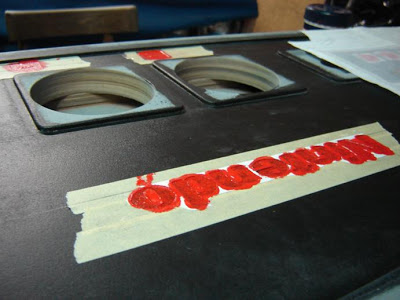 Half way through cutting the the tape, I accidentally cut myself real bad with the scalpel.
 Here's
 Next up was the 4 stripes that run down the controller;
 At
At Once
Once All
All Once
Once For
For After
After Here's

 I
I
 Meanwhile, I had to put the hinges on the lid and bottom part of the table so it could open and close.
 Here
Here Here is all the wiring for the buttons from the back. The wires there lead into the male side of the 9-pin plug.
 Here
Here And here are the final pictures of how the coffee table looks, all finished and awesome-like!
 May awesomely daggy 60s styled futon.
 Here you can see I have already filled it with crap. It's good though, my room is now a whole lot cleaner.
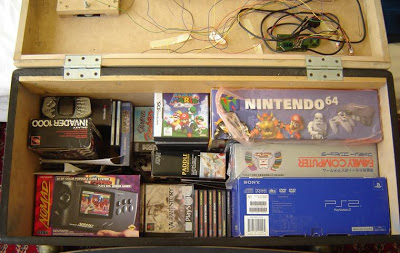 And here's a picture of my girlfriend having enormous amounts of retarded-looking fun playing Super Mario bros. 3;


